We all know the benefits of putting silicone around a bath, taps, a shower enclosure, a toilet or to help seal floors. The big question is how do you do silicone without it looking like a spider walked over it. Hopefully I can answer that question in this article.
If you have tried to do this before, and get a neat looking job, then I am sure you understand the frustration and pain, that go along with trying to achieve that task.
However I did find a really good solution, that made my previous efforts a long and distant memory. I will share that with you just below. Now I have to tell you, that many plumbers and professionals really disagree on how this should be done.
I have included two methods below as both work. I just think the first one I show you works a great deal better. It certainly delivers a highly professional looking finish.

How To Silicone a Bath Like A True Professional
There are just certain jobs that I call irksome, and grouting and applying silicone are right up there on my fiddly irritating and annoying list. It is not that they are hard to do, they just require time and patience, and of course the right technique.
To get a finish that looks like a professional is something that I always want for my home, and for any type of work that I do there. If you want a “proper job,” then enter the Fugi Kit.
It doesn’t really matter whether you are putting silicone around a bath, taps, a shower or even the floor, as the process is always the same. The Tools and materials that I recommend are;
- A silicone gun
- Silicone Tube of sealant
- Utility Knife
- Scraper
- Fugi Kit
The only thing that may be new to you is the Fugi kit, but these days I would not even contemplate attempting this job without this kit. When you read this article, and see the kit in action, you may just feel exactly the same way.
https://www.youtube.com/watch?v=_DI4hfHM_Hg
Begin with making sure all the joints and gaps are cleaned and grease free. Use a vacuum cleaner to remove any dust particles, and then de-grease the joints with some methylated spirits. That ensures a clean and bacteria free joint to work with.
Make sure you pick the right silicone for your joint. I cover the different types later in this article.
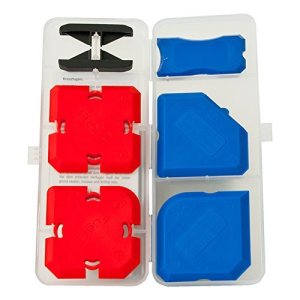
Buy yourself and use a “Fugi Silicone Profiling Tool,” for the very best results. You can check for availability at Amazon UK by clicking here.
Have a look around the edge of the bath or enclosure and identify where the widest gap is between the bath and the wall, or the enclosure or the floor.
Then pick the smallest tool to cover that gap, and an extra 2 to 3 mm on each side of that gap.
Cut the nozzle on the silicone tube to the exact width of the Fugi tool that you have picked. Don’t cut that at a angle though and simply make a straight cut.
Using the gun push the silicone all the way into the joint, making sure it is filled. Then use the adapter to smooth the lines out and create a really nice finish.
Do a little section at a time and take a rest in between so as you don’t get tempted to rush though this task.
Start with the corners first and then work from right to left. Once you get used to using this Fugi style profiler, you will never use anything else in my opinion.
How To Silicone Around A Shower Cubicle or Bath – Method 2
The method below is a much simpler method, but is very different to the one I have shown above. This one breaks many of the rules in the first method, but it is also cheaper and easier to achieve. This is still the most common method used by decorators in the UK.
If you watched the first video, you will see that this method has a lot of weaknesses. It makes a thin joint, is prone to bacteria and mould and also very prone to wear and tear when it is being cleaned.
This method also does not really push the silicone right into the joint, and that means the joint is weaker than it needs to be.
As I said, many plumbers and decorators still do this, so let’s see what that entails. Below you will find a video, that takes you through the process. if you haven’t time to watch this right now, I have summarised what is required just below the video.
How To Seal Your Bath – A Cheaper Method
If you want to use this standard method, then you will need certain tools. Without those your job will be really difficult. I have listed those below:
- A silicone gun
- A tube of silicone sealant – there are lots available, but a standard white sealant does the job nicely
- Low tack tape
- White Spirits
- A utility knife
- Some tissue – kitchen roll or even good old toilet paper
If you have those, then you can do a good enough job, with a little time and a whole lot of patience. Put the swear box somewhere handy though, as you will probably need it. This is a method that does not use the fugi kit.
How To Seal the Bath
Begin by CAREFULLY cutting the nozzle off the silicone tube. I have seen any number of people slicing into their fingers doing this job. Don’t be one of them who end up in the casualty for a 4-5 hour wait to get their fingers patched up.
Set the nose of the tube on something solid, and then cut it off. Never ever hold it in your hands and attempt that.
Once cut off, then place it inside the silicone gun, and squeeze the trigger to tighten it up. It normally takes about 5-6 squeezes to do that. Then attach the nozzle that comes with the tube of silicone.
TOP TIP: – Make sure when you are buying your silicone, that it has the nozzle attached to the side. Naughty people tend to remove these from the big DIY stores, so make sure yours is complete.
Once the nozzle is attached, then cut the end off it at a slight angle, (around 45 degrees) as that allows you to get the nozzle right into the corners of the bath. It also allows the silicone to move more freely. Cut it as close to the bottom of the nozzle as you can.
You are now ready to go.
How To Prevent Silicone Coming Away From the Bath Edges
I am sure you have seen where the silicone tends to crack around the edges of the bath. That happens as many plumbers and many DIY people silicone the bath, when it is empty. A top tip is to actually fill the bath, and then do your silicone and sealing work.
If you seal when the bath is empty, then when you next use the bath, the weight of the water combined with the weight of the person getting into the bath, pulls down at the edges of the silicone. That stretches the silicone and ends up creating a pulled away edge. that is not a pretty site.
To avoid that happening fill the bath with cold water (don’t get in though) and then seal the edges and around the taps.
Tape off the Tiles or Walls
If you want really neat edges, it is time to get the tape out. Always use what is called low tack tape, as that is a great deal easier to get off, when the silicone has dried. Tape off the tiles around the bath, leaving just a small gap for the silicone. This avoids white silicone sticking to different coloured tiles, and will leave a very neat finish.
Take your time with this, and as best you can, try to leave something like a 3 mm gap between the bath and the walled surface. Now also tape off the bath edge and again leave a 3 mm gap. Essentially you are creating a very neat line for the silicone to get into.
It’s Silicone Time
Once taped up, you can get ready to use the gun. When doing that try hard to keep constant pressure on the trigger to ensure a really nice flow. Be generous with the silicone as that allows you do have a full and proper seal. Start in one corner and do the smallest edge first.
Apply a good layer of silicone between the tape, and make sure it is covered end to end. Put the gun down, and then dip your finger into the white spirit. This helps move the silicone around more easily, and smoother and also makes it easy to get the silicone off your fingers.
If you don’t have white spirit, then add some washing up liquid to some water, and use that. It does exactly the same job.
Run your finger, with a firm pressure along the line of silicone to create a neat and uniform seal. If you see any gaps, then add some more silicone and repeat the process with your finger, until you have a smooth and neat edge.
Repeat this process with the other edges, making sure that you get right into the corners. Once you are satisfied with your lines, then you can remove the tape. You should now have neat and tidy lines around the bath. With the taps, you do the same thing, though they will be more fiddly.
Video – How To Properly Silicone Around A Bath
Sometimes it is better to watch, than to read. In this video below, you can see how to do the preparation, and then execute the actual task. It is well worth around 5 minutes of your time, to watch this one.
https://www.youtube.com/watch?v=NzkZu7wQK6U
How To Remove Old Silicone Sealant
No-one likes doing this job, and it is one that I particularly hate doing. However, there are some silicone remover products and scrapers that do make this job a little more tolerable. If you don’t want to spend any money on those, then a utility knife will get the job done.
Just be careful with your fingers, and protect the surfaces so as they don’t get scratched. Switch the radio on though as doing it this way will drive you slowly insane.

These removers come in either tubes or sprays, and the purpose of those is to help soften up the old silicone, which can then be removed with a knife or some type of scraper.
In reality the way they work best is to first remove as much old silicone as you can first. Then spray or apply the remover, let it sit for around 3 hours, and then go back with the scraper to get the tougher parts out.
When you have done that, then clean the joint with methylated spirits to remove any grease.
Can You Silicone On Top of Old Silicone?
The quick answer is yes you can. Silicone will easily stick to other silicone in almost every case. The only time that I wouldn’t do that, is if the older job was not that neat and tidy. I wouldn’t want to end up with a job looking like that.
If that were the case, then I would remove it and replace it. For sure that is a lot more work, but I think worth it in the end. Likewise if the old silicone was covered in mould, I would also want to remove it, rather than just go over the top with a new layer of silicone.
How To Remove Mould From a Silicone Sealant?
Over time and with a mixture of dampness and cold, mould will eventually build up on any silicone edges around taps and baths. You are then left with two choices if you want to restore it to a nice clean line.
- Try to clean it
- Remove it and replace it
Cleaning silicone is problematic at best. I have used many of the industrial cleaners and had mixed results. I have also used bleach and that has worked. The problem is not so much how well they work, but how long it lasts. The answer is that they really only last for a few months, before the problem of dark mould returns.
For a quick clean up though, the one that works best is the HG Mould Cleaner Spray, currently available at Amazon UK. Out of the many different ones that I have tried, this one worked the best.
When there is old mould is coming from under the old silicone, then that underlying problem has not been fixed, by cleaning the outer layer of silicone. In my opinion, it is always better to replace it with new silicone, even though that is a lot more work.
What Types of Silicone Sealant Are Actually Available?
There are two types available on the UK market place. These are known as:
- High Modulus Silicone – this type can withstand cleaning and is a tough and rigid type of silicone – ideal for the sides of shower cubicles, around taps and floors
- Low Modulus Silicone – This is a more elastic, flexible type and is an ideal choice for moving joints such as around a bath
You can buy these as clear silicone, white silicone and you can also get coloured silicones that will match the grout on your tiles. The one that I always use is the Unibond Anti Mould Sealant, available at Amazon, and I have always found it to be my own favourite.
How To Seal A Bath With A Large Gap
In some houses, and depending on how the builders left it, you may find larger gaps between the bath and the wall. Those can be really annoying to fix and fill. They are actually there for a reason as they are known as expansion joints. That allows for some movement between the bath and the wall.
However, sometimes they are just left to big. 1/4″ is ideal and that can usually filled by either of the two methods I have described above.
Gaps Up to 1/2″
The best way to do that is to fill it with two beads of silicone, with one running along the wall, and the other one running along the bath.
Then run your finger to push each bead into the joint, before smoothing it out.
If the gap is bigger than 1/2″, I would recommend filling the gap with some type of waterproof filler, and allow that to harden. The fill it in with a normal run of silicone. If the problem is really bad, then you can use what are called backer rods to fill the gap.
These are foam based rods which are waterproof, and they are a good method to use for the very large gaps. If it is in a new home, where you haven’t tiled yet, then you should consider using a bath tub flange. some people also use the foam spray that you can buy in a can.
They squirt that in, and then use the silicone on top of that.

Best Silicone Sealant Gun Reviews

Really helpful clear and practical advice; much appreciated.